How to Read a Camera Histogram
Read shadows, midtones, highlights, and clipping on a camera histogram—and use the graph without trying to force every photograph into one shape.
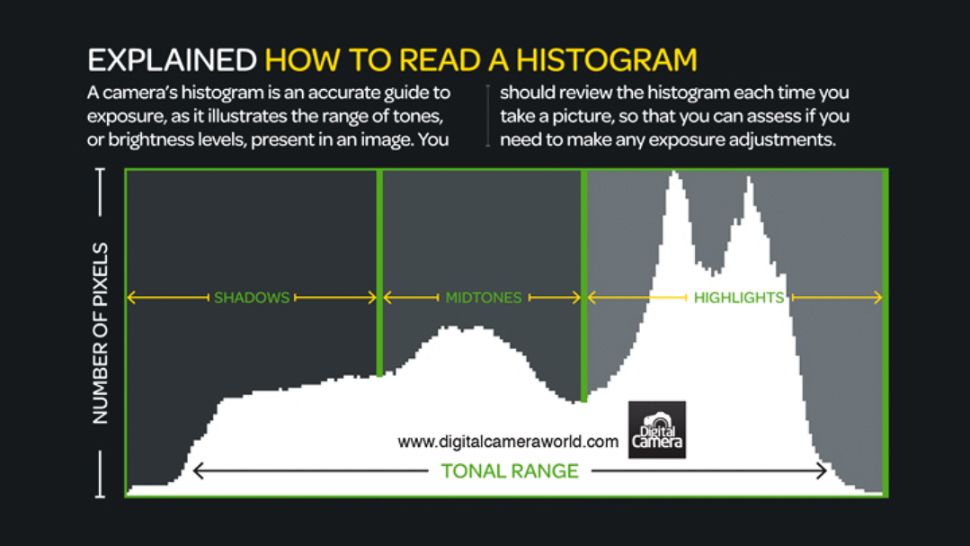
The camera meter predicts exposure before capture. A playback histogram analyzes the image the camera has just created. Many mirrorless cameras can also show a live histogram before you press the shutter.
Histogram axes in plain English
A brightness histogram is a graph with two dimensions:
- Horizontal position: brightness from black on the far left to white on the far right.
- Vertical height: the relative number of pixels at each brightness.
A tall peak does not mean that tone is good or bad. It means many pixels share a similar brightness. A low area means fewer pixels occupy those values.
The graph is commonly divided into:
- shadows on the left;
- midtones through the center; and
- highlights on the right.
These are broad regions, not fixed editing boundaries.
What a dark-scene histogram should look like
A night street, black backdrop, or low-key portrait contains many dark pixels. Its histogram should naturally gather toward the left. Moving the graph into the center merely to make it look “balanced” can turn night into gray daylight and clip lamps or signs.
Look for separation between meaningful dark detail and the far-left edge. Some pixels may be intentionally black. The question is whether the coat, hair, building, or other important dark subject has the detail your photograph needs.
What a bright-scene histogram should look like
Snow, white interiors, fog, pale sand, and high-key studio scenes contain many bright pixels, so their histograms lean right. A camera meter may make them too dark unless you add positive exposure compensation.
Keep the important whites bright without allowing valuable texture to collapse into featureless white. Specular reflections, the sun, and bare bulbs may clip without damaging the photograph because they contain no detail you expected to preserve.
What clipping looks like
Clipping occurs when values exceed what the file can distinguish and are recorded as the same minimum or maximum value. Clipped highlights lose color and texture; clipped shadows become solid black.
A strong vertical pileup pressed against the right edge suggests highlight clipping. A pileup at the left suggests shadow clipping. The histogram cannot tell you which objects those pixels belong to, so combine it with the image and highlight warning.
If important highlights clip, reduce exposure by using a faster shutter, narrower aperture, lower ISO where it changes the capture strategy, or negative compensation. If critical shadows clip and highlights have room, increase exposure.
Clipping is a content decision, not an automatic failure. Protect a white wedding dress before a bare bulb; protect a face in shadow before an empty black corner.
Why there is no perfect histogram
Advice that every good histogram should form a centered bell curve is false. The graph describes the scene:
- a silhouette can have peaks near both edges and little in the middle;
- a foggy scene can form a narrow mound of mid-bright tones;
- a graphic black-and-white subject can contain two separated peaks;
- a small bird against an empty sky may create one large sky peak and a small subject peak.
A histogram cannot identify aesthetic intention, subject importance, or local contrast. Use it to answer specific questions about tones, not to grade the photograph by shape.
Brightness histogram versus RGB histogram
A brightness or luminance-style histogram combines color information into one tonal graph. An RGB histogram displays red, green, and blue channels separately or overlaid.
Color channels can clip independently. A red flower, neon sign, saturated stage light, or sunset may lose detail in one channel even when the overall brightness graph appears below the right edge. The affected area can look flat or shift hue.
Check RGB histograms when strong saturated colors matter. Reduce exposure if the channel detail is important, or change lighting and color rendering where practical.
Why the camera histogram is not a perfect RAW histogram
Most cameras build the displayed histogram from an embedded or rendered preview affected by:
- picture style or creative look;
- contrast, saturation, and sharpening;
- white balance;
- dynamic-range optimization;
- color space; and
- JPEG tone curves.
A RAW file may retain some highlight or shadow information beyond what the preview suggests. The reverse risk also exists for an individual color channel or an aggressive later conversion.
For a preview closer to flexible RAW processing, many photographers use a low-contrast neutral picture style. This does not change all RAW data, but it changes the histogram and highlight warning you see. Test your camera rather than assuming a universal recovery amount.
Live histogram versus playback histogram
A live histogram estimates the result before capture. It is useful while changing composition or exposure, but it may lag, exclude flash contribution, or change behavior in very dark scenes.
A playback histogram describes the captured preview and is the stronger check after the exposure. Some cameras can show a histogram for a magnified area, making it easier to inspect a face, product, or highlight rather than the whole frame.
Neither replaces checking focus and movement. A beautifully placed histogram can accompany a blurred photograph.
Using the highlight warning
The playback highlight warning—often called blinkies—flashes areas whose preview values reached or approached white. It adds location to the histogram's tonal information.
If blinkies appear only in the sun or a reflection, they may be harmless. If they cover skin, feathers, fabric, clouds, or product labels, reduce exposure and check again. Remember that the warning is preview-based.
How exposure changes the histogram
When scene light and composition remain fixed:
- more exposure generally moves values toward the right;
- less exposure moves them toward the left;
- changing contrast spreads or compresses tones rather than simply shifting all of them; and
- changing white balance can move individual RGB channels.
One stop more exposure might come from doubling shutter time, opening aperture one stop, or changing the lighting. Raising ISO changes recorded brightness but does not increase the light collected by the sensor. The ISO guide explains that distinction.
Expose to the right—carefully
Expose to the right, or ETTR, means giving a RAW capture as much useful light as possible without clipping important highlights, then setting final brightness in processing. More captured light can improve shadow signal-to-noise ratio.
It is not a command to make every preview bright. It works only when you can add exposure without harming shutter speed, depth of field, subject movement, or highlights. It is also unnecessary when the current exposure already meets the output requirement.
For a moving subject, increasing exposure time may create blur. Opening aperture may remove needed depth. Raising ISO shifts brightness but does not collect more light. Preserve the photograph before optimizing the graph.
High-contrast scenes
If important shadows touch the left edge while important highlights touch the right, the scene may exceed the usable range of one exposure. Moving exposure saves one side by losing more of the other.
Options include:
- change the lighting or add fill;
- photograph when contrast is lower;
- use graduated filtration where appropriate;
- bracket stationary scenes for a careful blend;
- accept a silhouette or clipped light source; or
- prioritize the tones that carry the story.
The histogram identifies the conflict; it does not choose the creative solution.
A five-step histogram workflow
- Make a test frame with the intended aperture, shutter speed, and ISO strategy.
- Look at the photograph and identify important shadows and highlights.
- Check the brightness and RGB histograms for edge pileups.
- Use the highlight warning to locate bright clipping.
- Adjust in small steps, then recheck motion, depth of field, focus, and tone.
Practice exercise
Photograph a scene containing a dark object, midtone subject, and bright object at -2, -1, 0, +1, and +2 EV. Compare the histogram movement, highlight warning, shadow detail, and final editable files. Repeat with a naturally dark night scene and bright snowy or white scene. You will learn why the correct graph depends on content.
Common histogram mistakes
- Centering every graph. Preserve the scene's natural brightness.
- Assuming a tall peak is clipping. Height means quantity; edge position indicates possible clipping.
- Ignoring RGB channels. Saturated color can clip before combined brightness appears extreme.
- Treating preview limits as exact RAW limits. Picture settings affect the displayed graph.
- Checking tone but not sharpness. Exposure tools do not diagnose focus or motion.
- Protecting meaningless highlights at the expense of the subject. Decide which detail matters.
Sources and further reading
The tonal-axis and clipping explanations were checked against Nikon's official Learning How to Use Your Camera's Histogram guide. Live-view and highlight-display behavior was cross-checked with Nikon's Histogram for Video guide. Display options and preview behavior vary by camera and recording mode.
Frequently Asked Questions
-
It represents dark tones. A pileup at the far-left edge may indicate clipped black pixels, but a night scene can legitimately contain many dark values.
-
There is no universal shape. It should reflect the intended scene without losing important shadow or highlight detail. A bright scene leans right; a dark scene leans left.
-
Look for a strong pileup at the right edge, check the RGB channels, and use the highlight warning to locate affected areas. Decide whether those pixels contain detail that matters.
-
It is generally based on a processed preview affected by picture style, white balance, contrast, and other settings. It does not map RAW limits perfectly.
-
It can when the scene contains true black and bright white. Touching an edge is not automatically wrong, but a hard pileup may indicate clipping. Inspect which parts of the photograph are affected.