Focus Peaking Explained: How to Use It Accurately
Learn what focus peaking highlights, how to choose peaking level and color, and when to combine it with magnification for reliable manual focus.
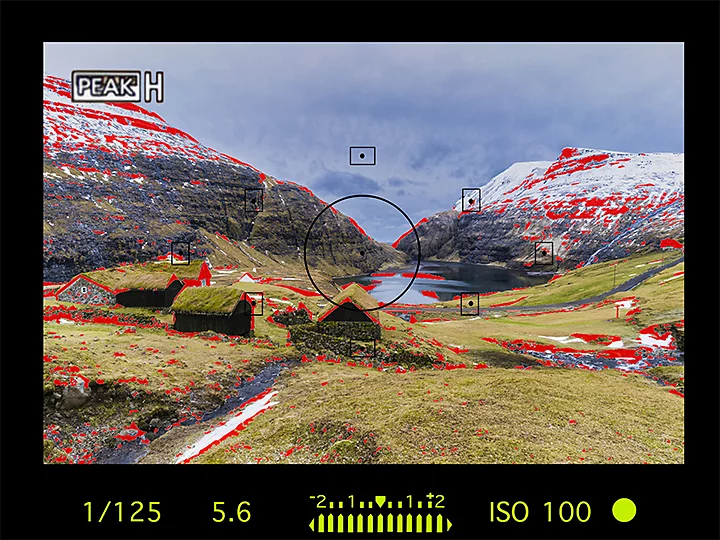
What focus peaking does
When an image edge becomes sharper, its brightness changes more abruptly across neighboring pixels. Focus peaking analyzes the live-view image for this local contrast and places a false-color highlight on edges that exceed a threshold.
As you turn the focus ring, colored outlines appear, strengthen, move through the scene, and disappear. This gives an immediate sense of which distance is near focus.
The camera is not painting the actual focus plane. Texture, noise, sharpening, aperture, and display resolution all influence the detected edges.
When focus peaking is useful
- Manual-focus lenses: adapted vintage lenses and mechanical primes without autofocus.
- Video: follow focus while the subject or camera moves.
- Macro and products: see the narrow sharp region move across small details.
- Landscapes: estimate which foreground and distance edges fall within depth of field.
- Architecture and interiors: inspect repeated lines across the frame.
- Direct Manual Focus: refine autofocus by turning the ring after AF acquisition.
Peaking is especially helpful when magnifying the display would hide the rest of a moving composition.
How to enable it
Look for Peaking Display, Focus Peaking, MF Assist, or a similar menu. It may operate only in Manual Focus or Direct Manual Focus, while some cameras also allow it during autofocus or video.
Common controls include:
- display on or off;
- low, medium, or high peaking level;
- red, yellow, blue, or white peaking color; and
- a custom-button assignment.
Availability in the viewfinder, rear screen, clean HDMI output, recording, and playback varies. Consult the model manual.
Choose the peaking level
The level controls the threshold for highlighting:
- High: many edges light up. Easy to see, but broad and less selective.
- Medium: useful general starting point.
- Low: fewer, stronger edges appear. Better for refinement, but subtle on a low-resolution screen.
Manufacturers do not use identical naming. On some interfaces a “high” sensitivity means more display; on others the wording may refer to edge strength. Test it rather than relying on the label.
Begin with medium. If nearly the entire scene sparkles, reduce the level. If nothing appears even when focus looks close, raise it or magnify.
Choose a visible color
Red stands out against green landscapes but disappears on red clothing, flowers, and signs. Yellow is visible against blue scenes but can blend into autumn foliage. White can vanish in snow or bright architecture.
Change color for the subject. The most accurate setting is useless if you cannot see it quickly.
Use magnification for critical focus
Focus peaking is excellent for locating the focus region. Magnification is better for confirming the exact detail.
- Frame the photograph.
- Use peaking to move focus toward the desired subject.
- Place the magnification box on the eye, star, text, or texture that must be sharp.
- Magnify and turn the ring slowly through best focus, then return to the sharpest point.
- Exit magnification and confirm composition before capture.
On a tripod, magnification should be the final authority. For moving video, peaking may be the only practical continuous guide.
Use peaking to find focus quickly and magnification to verify it precisely.
Why peaking can be wrong
High-contrast texture away from focus
Brick, grass, fabric, hair, and fine patterns can create enough contrast to trigger even when they are not at the exact focus peak.
Noise in low light
High ISO preview noise creates false edges. The screen may sparkle across shadows, making the overlay less trustworthy.
Display sharpening
Creative styles and monitor sharpening can increase edge contrast. Peaking may look stronger without the optical focus improving.
Depth of field
At a narrow aperture, many distances look acceptably sharp and can receive highlights. This does not reveal which distance is most precisely focused.
Low-contrast subjects
Skin, fog, a smooth product, or a star against noisy darkness may not produce enough edge contrast. The subject can be in focus with little overlay.
Aperture and peaking behavior
Some cameras preview with the lens wide open until capture, while others stop down during depth-of-field preview, video, or certain modes. A wide-open preview shows a narrower focus region; stopping down makes more edges appear within depth of field.
For a wide-aperture photograph, verify focus at or near the taking aperture when possible. Focus shift can cause some lenses to move best focus as the aperture closes.
Our f-stop guide explains why depth of field changes without turning peaking into a precise distance measurement.
Focus peaking for portraits
At f/1.4 or close distance, a colored outline on eyelashes, hair, glasses, and eyebrows does not guarantee the iris is sharp. Magnify the nearest intended eye. If the subject moves, autofocus eye detection may be more reliable than manual peaking.
For a posed subject with a manual lens, ask them to hold position, focus carefully, shoot a short sequence, and check playback magnification.
Focus peaking for landscapes
Peaking can show foreground and distant edges simultaneously, but it does not calculate hyperfocal distance or reveal final print sharpness. Use it to estimate, then magnify the closest important detail and the distance.
Do not focus at infinity automatically. The best focus distance depends on foreground, focal length, aperture, and output.
Focus peaking for macro
Macro depth of field is extremely thin. Slight body movement changes focus more than a tiny ring adjustment. On a tripod, magnify and use a focusing rail or careful subject placement. Handheld, move the camera gently through focus and time the shutter as the desired detail peaks.
At high magnification, stopping down adds depth but can introduce diffraction and slower shutter speeds.
Focus peaking for video
Use a color that remains visible across the scene and the lowest level that is still practical. Too much overlay can obscure expression and composition.
Before recording, rehearse the focus pull and mark lens positions if repeatability matters. During recording, look at the subject rather than chasing every flashing edge. An external monitor with better peaking and magnification may be easier to judge.
Peaking versus zebras
Both use striped or colored overlays, but they answer different questions:
- Focus peaking: where edge contrast suggests focus.
- Zebras: where brightness reaches a chosen exposure level.
Do not interpret a zebra as sharpness or a peaking color as clipping.
Peaking versus focus map
Some cameras offer a focus map that colors areas in front of and behind the focus region differently. Peaking highlights edge contrast. The focus map can communicate direction; peaking can be less visually intrusive. Neither replaces magnification.
A practical setup
- Switch to MF or DMF.
- Enable peaking at medium level in a contrasting color.
- Assign peaking or magnification to an accessible button.
- Focus on a textured stationary subject, then compare low, medium, and high.
- Make frames using peaking alone and peaking plus magnification.
- Review at high magnification to learn which display level matches your camera.
Common mistakes
- Assuming every colored pixel is perfectly sharp. It is a thresholded edge estimate.
- Using high level because it looks reassuring. More overlay can mean less selectivity.
- Choosing a color that matches the scene. Change it as conditions change.
- Skipping magnification at critical aperture or macro distance. Confirm the essential detail.
- Expecting the overlay in the recorded file. It is normally display-only.
- Using peaking when autofocus is more reliable for action. Choose the tool for the subject.
Sources and further reading
The display behavior, selectable level and color, and use with Manual Focus and Direct Manual Focus were checked against Sony's official Peaking Display documentation and Manual Focus Customization guide. Exact menu paths and output behavior vary by camera.
Frequently Asked Questions
-
It colors high-contrast edges in the live image that are likely near focus. It does not identify the important subject or prove exact focus.
-
Start with medium. Lower the level if too much of the scene lights up; raise it if useful edges remain invisible. Compare the result with magnified playback on your camera.
-
The color that contrasts most with the current scene. Red often works in green landscapes, while yellow, blue, or white may be clearer for other subjects.
-
Normally no; it is a monitoring overlay. Clean HDMI and internal recording behavior vary, so verify the camera and output settings before production.
-
No. Peaking is faster for locating the focus region, while magnification is usually more reliable for checking one critical detail.