F-Stops Explained: Wide vs. Narrow Aperture
Understand why small f-numbers mean wide apertures, how full stops change exposure, and how aperture affects depth of field, sharpness, and bokeh.
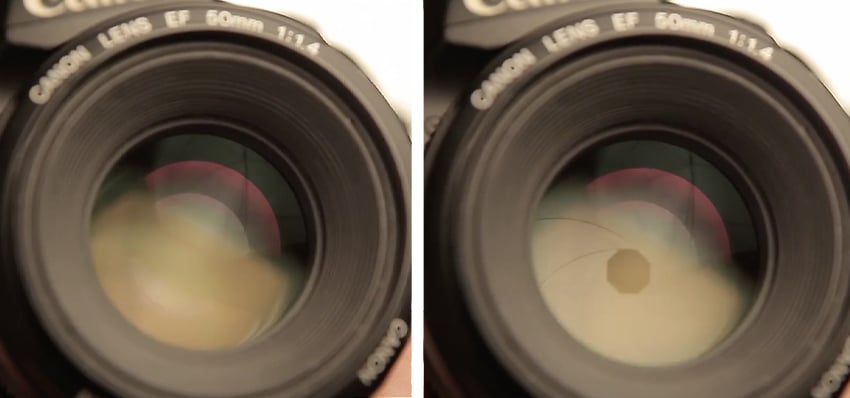
Inside most camera lenses is an adjustable diaphragm made from overlapping blades. The opening formed by those blades is the aperture. Your camera or lens controls its size, usually in steps marked f/1.4, f/2, f/2.8, f/4, and so on.
What does an f-stop measure?
The f-number is the lens's focal length divided by the diameter of its effective aperture. It is written as f/N, where N is the number shown in the camera.
For a simple example, a 50mm lens with an effective opening 25mm across is operating at 50 ÷ 25 = f/2. If the effective opening narrows to 12.5mm, it is 50 ÷ 12.5 = f/4.
This division explains the apparently backward labels:
- f/1.8: a wide opening that admits more light.
- f/5.6: a medium opening that admits less light.
- f/16: a narrow opening that admits much less light.
Think of the number as the denominator of a fraction. One-half is larger than one-sixteenth, so f/2 represents a larger relative opening than f/16.
The full-stop aperture sequence
The traditional full-stop sequence is:
f/1 → f/1.4 → f/2 → f/2.8 → f/4 → f/5.6 → f/8 → f/11 → f/16 → f/22
Moving one step to the right halves the light reaching the sensor. Moving one step to the left doubles it. Therefore:
- f/2.8 admits twice as much light as f/4.
- f/4 admits twice as much light as f/5.6.
- f/8 admits one-quarter as much light as f/4.
The numbers increase by roughly the square root of two rather than simply doubling because the area of a circular opening depends on the square of its diameter. You do not need the mathematics while shooting; remember that each full stop doubles or halves the light.
Modern cameras commonly offer one-third-stop settings, which is why you also see values such as f/3.2, f/3.5, f/4.5, and f/6.3. Three clicks on a one-third-stop control equal one full stop.
Wide aperture: low f-number
A wide aperture might be f/1.4, f/2, or f/2.8, depending on the lens. It admits more light and usually reduces the range of distances that appear acceptably sharp.
When a wide aperture helps
- Low light: more light allows a faster shutter speed or lower ISO.
- Portrait separation: shallow depth of field can soften a busy background.
- Action: a wide opening can support a shutter speed fast enough to freeze movement.
- Visual emphasis: selective focus directs attention toward one detail.
- Night sky photography: a fast lens can collect more starlight during a limited exposure time.
Wide-aperture limitations
Shallow depth of field makes focus placement more critical. At close portrait distances, one eye may be sharp while the other is not. In macro photography, the sharp zone can become only a few millimeters deep.
Some lenses also show more vignetting, chromatic aberration, softness, or coma at their widest setting. These are not reasons to avoid the maximum aperture when the photograph needs it. They are reasons to test the lens and understand its rendering.
Narrow aperture: high f-number
A narrow aperture might be f/8, f/11, or f/16. It admits less light and usually increases depth of field when the other conditions remain the same.
When a narrow aperture helps
- Landscapes: keep more of the foreground and distance acceptably sharp.
- Architecture and interiors: maintain detail across several planes.
- Group portraits: give people in different rows more focus tolerance.
- Macro work: recover some depth of field at close focus.
- Long exposures: reduce incoming light when you deliberately want a slower shutter.
- Sun stars: a small aperture can turn bright point sources into rays whose appearance depends on the diaphragm blades.
Narrow-aperture limitations
Less light means the camera must use a slower shutter speed, higher ISO, brighter illumination, or some combination of the three. A tripod prevents camera movement during a long exposure, but it does not stop wind-blown leaves, waves, people, or animals from moving.
Stopping down also cannot make every distance sharp. Depth of field extends around the focused distance; it does not replace thoughtful focusing. If the camera focuses on the horizon, a very close foreground can remain soft even at f/16.
Aperture choice is a tradeoff: opening the lens gains light and reduces depth of field; closing it loses light and increases depth of field—until diffraction begins to reduce fine detail.
What is depth of field?
Depth of field is the zone in front of and behind the focused distance that appears acceptably sharp in the final image. Only one precise plane is theoretically in focus, but nearby detail can look sharp enough at a given print size and viewing distance.
Aperture is only one of several controls:
- Aperture: a wider aperture produces shallower depth of field when other factors stay the same.
- Focus distance: focusing closer generally produces shallower depth of field.
- Focal length and framing: changing focal length, camera position, and magnification changes how blur appears.
- Sensor format and output: comparisons depend on matching the field of view, framing, aperture, and final viewing conditions.
- Subject-to-background distance: moving the background farther from the subject makes it look more blurred even though it does not directly change the focused plane.
This is why f/2.8 does not create the same look in every situation. A close-up at f/2.8 can have almost no depth, while a distant landscape at f/2.8 may appear sharp across a large range.
Aperture and exposure
Aperture, shutter speed, and ISO work together. If you close from f/4 to f/5.6, you remove one stop of light. To maintain the same recorded brightness, you can:
- halve the shutter speed, such as changing 1/250 to 1/125 second;
- double the ISO, such as changing ISO 100 to ISO 200; or
- add one stop more illumination.
The visual consequences differ. A slower shutter records more movement, while higher ISO usually increases visible noise and reduces highlight range. Our exposure triangle guide shows how to choose the least harmful tradeoff.
Maximum and minimum aperture
A lens name lists its maximum aperture, meaning the widest opening available. A 50mm f/1.8 lens can open to f/1.8, but it can also close to settings such as f/2.8, f/5.6, or f/11.
Zoom lenses may show one maximum value or a range:
- 24–70mm f/2.8: f/2.8 is available throughout the zoom range.
- 18–55mm f/3.5–5.6: the widest available aperture changes from f/3.5 at 18mm to f/5.6 at 55mm.
The minimum aperture is the narrowest setting, often f/16, f/22, or f/32. “Minimum” refers to opening size, not the number printed on the display.
A lens with a wide maximum aperture is often called fast because it can support a faster shutter speed in the same light. It does not mean the autofocus or zoom mechanism is faster.
Why very small apertures can look softer
As light passes through a very small opening, it spreads through diffraction. Diffraction is a normal wave behavior, not a lens defect. Its effect becomes more visible as the aperture narrows and as the image is examined more closely.
Closing from the widest aperture often improves corner performance and reduces several aberrations. At some middle setting, many lenses produce their strongest overall detail. Closing much farther increases depth of field but gradually reduces pixel-level crispness through diffraction.
There is no universal sharpest f-stop. Sensor resolution, format, lens design, subject depth, focus accuracy, and final output all matter. In a landscape, a slightly diffraction-softened foreground that is within the depth of field may be more useful than a theoretically sharper f/4 image with the foreground completely blurred.
A practical starting point is f/5.6 or f/8 for general scenes, then adjust for the depth and shutter speed you actually need.
Aperture shape, bokeh, and sun stars
Bokeh describes the visual character of out-of-focus detail, not simply how much blur exists. The number, shape, and curvature of aperture blades can affect how out-of-focus highlights look when the lens is stopped down. Optical corrections and the subject itself also influence the result.
At a narrow aperture, the blade edges diffract light from small bright sources into rays. The number and shape of those sun-star rays depend partly on the diaphragm design. Use them deliberately, and avoid looking at the sun through an optical viewfinder.
F-stops and T-stops are not identical
An f-stop is calculated from focal length and entrance-pupil diameter. It describes geometry. A T-stop, used mainly on cinema lenses, accounts for the light actually transmitted after optical losses.
Two photography lenses set to the same f-number can transmit slightly different amounts of light. Camera metering normally compensates for this in ordinary still photography. Cinema productions use calibrated T-stops when consistent exposure between lenses and shots is especially important.
Useful starting apertures
These are starting points, not rules:
- Single-person portrait: f/1.8–f/4, depending on distance and how much of the face must be sharp.
- Small group: f/4–f/8, with people arranged as close to one focus plane as practical.
- Street and travel: f/4–f/8 when light permits.
- Landscape: f/5.6–f/11, combined with deliberate focus placement.
- Macro: f/5.6–f/16, while watching diffraction and subject movement.
- Night sky: near the lens's widest usable aperture, balanced against star shape and corner quality.
Always check the resulting shutter speed and ISO. Aperture Priority is a convenient mode for learning because you select the f-number while the camera balances other exposure settings. The mode is marked A or Av; the beginner camera guide explains how it fits with the other shooting modes.
A simple aperture exercise
- Place one subject about one meter from the camera with a detailed background several meters behind it.
- Use Aperture Priority, a fixed ISO, and a stable camera position.
- Focus on the same point and photograph the scene at the widest aperture, f/2.8, f/4, f/5.6, f/8, f/11, and f/16 where available.
- Let the camera adjust shutter speed. If it becomes too slow for handheld work, use a tripod or brighter light.
- Compare background blur, the depth of the sharp zone, corner detail, shutter speed, and the shape of bright highlights.
Repeat at a much greater subject distance. You will see that the same aperture creates a different amount of apparent depth.
Common aperture mistakes
- Using the widest aperture automatically. More blur is not always better, and missed focus can ruin the important detail.
- Using f/22 for every landscape. Focus placement and scene depth matter, while diffraction may reduce fine detail.
- Ignoring shutter speed. Closing the aperture can quietly produce camera shake or subject blur.
- Calling f/16 a large aperture. The number is large, but the physical opening is small.
- Expecting aperture alone to remove the background. Subject distance, background distance, focal length, and framing also shape the blur.
- Assuming every lens is best at the same setting. Test the equipment and judge the complete photograph at its intended size.
Sources and further reading
The stop sequence, light-change examples, and Aperture Priority behavior were checked against Sony's official Aperture (F-number) and A-Mode guide. Depth-of-field factors were cross-checked with Canon's Depth of Field reference and Sony's Factors of Defocus. Lens-label and maximum-aperture explanations were verified with Nikon's Understanding Maximum Aperture.
Frequently Asked Questions
-
f/2 is a wide aperture. It admits much more light than f/8 or f/16 and usually creates shallower depth of field when the other conditions remain the same.
-
The f-number is a ratio: focal length divided by effective aperture diameter. A smaller denominator represents a larger relative opening, so f/2 is wider than f/8.
-
One full stop doubles or halves the transmitted light. The traditional sequence includes f/2, f/2.8, f/4, f/5.6, f/8, and f/11. Moving from f/5.6 to f/4 doubles the light; moving from f/5.6 to f/8 halves it.
-
There is no universal value. Many lenses perform strongly around f/5.6 or f/8, but subject depth, focus placement, diffraction, lens design, and output size matter. Choose enough depth of field for the scene rather than chasing one laboratory number.
-
No. It increases the zone of acceptable sharpness, but focus distance, focal length, subject distance, and viewing conditions still determine what appears sharp. Movement can also blur a photo if the narrower aperture forces a slow shutter speed.