Outdoor Photography Lighting Guide
Plan outdoor photos around sun angle, weather, shade, golden hour, blue hour, reflectors, and changing exposure instead of hoping for one kind of perfect light.
Start with the sun's position
Weather tells you whether clouds are likely; it does not tell you where shadows will fall. Note the sunrise and sunset direction, the sun's height during the session, and whether buildings, trees, or mountains will block it earlier than the published horizon time.
Then decide whether the subject should be front-lit, side-lit, or backlit. If those terms are unfamiliar, the directional lighting guide shows how each position changes form and contrast.
Direct sunlight
A clear sky produces a small apparent source—the sun—with hard-edged shadows. When the sun is low, those shadows stretch across the scene and reveal terrain, architecture, and texture. When it is high, shadows become short and fall beneath brows, noses, leaves, and ledges.
Direct sun is useful for saturated color, graphic shapes, silhouettes, rim light, sparkling water, and fast shutter speeds. It becomes difficult when a face needs even illumination or the scene includes bright reflective surfaces and deep shade.
Golden hour
Golden hour is the period after sunrise or before sunset when the sun is low and its path through the atmosphere often makes direct light warmer. Its exact duration depends on latitude, season, terrain, weather, and how strictly you define it.
Use the low angle for side light across a landscape, backlight through hair or leaves, or warm front light. Exposure changes quickly, so make a test sequence before the best moment and watch the histogram instead of reusing one setting.
Warm light is not automatically flattering. Green foliage or a bright wall can add an unwanted color cast to shadowed skin. Compare a neutral reference when color accuracy matters.
Blue hour and twilight
Before sunrise and after sunset, the sky can provide cool, even illumination while artificial lights remain visible. This balance is valuable for cityscapes, architecture, waterfronts, and environmental portraits.
Light levels fall rapidly. Use a tripod for static scenes, image stabilization within its limits, or a higher ISO and wider aperture for people. Bracket carefully when signs and windows are much brighter than the surroundings.
Overcast light
Cloud cover turns much of the sky into a large source, softening shadows and lowering contrast. It is excellent for portraits, forests, waterfalls, flowers, details, and products photographed outdoors.
Overcast does not mean directionless. The brightest part of the sky still creates a dominant direction. Place the subject near the edge of a covered area or turn the face toward the open sky to create modeling. Deep under trees, overhead light can still make eye sockets dark.
Muted skies may occupy too much empty space in a landscape. Recompose around texture and color, or wait for a brighter break in the clouds to spotlight part of the scene.
Open shade
Open shade is an area protected from direct sun but exposed to a large portion of bright sky—for example, beside a building, under a porch edge, or just inside a tree line. It gives a subject soft light without the patchy highlights of direct sun through leaves.
Face the subject toward the open sky. If the background remains in full sun, it may be several stops brighter and distract from the face. Change your camera angle, move deeper into the shade, or find a darker background at a similar light level.
Dappled light
Sun filtered through foliage creates moving bright spots. It can feel lively in a wide scene, but a single hot patch across a face is difficult to correct.
Move the subject a small distance into complete shade, wait for a cloud, or use a diffuser large enough to cover the subject. For environmental images, expose to preserve the bright pattern and place important features deliberately within it.
Reflectors and natural bounce
A reflector does not make sunlight soft by itself; it redirects light into a shadow. Its effect depends on size, surface, distance, and angle.
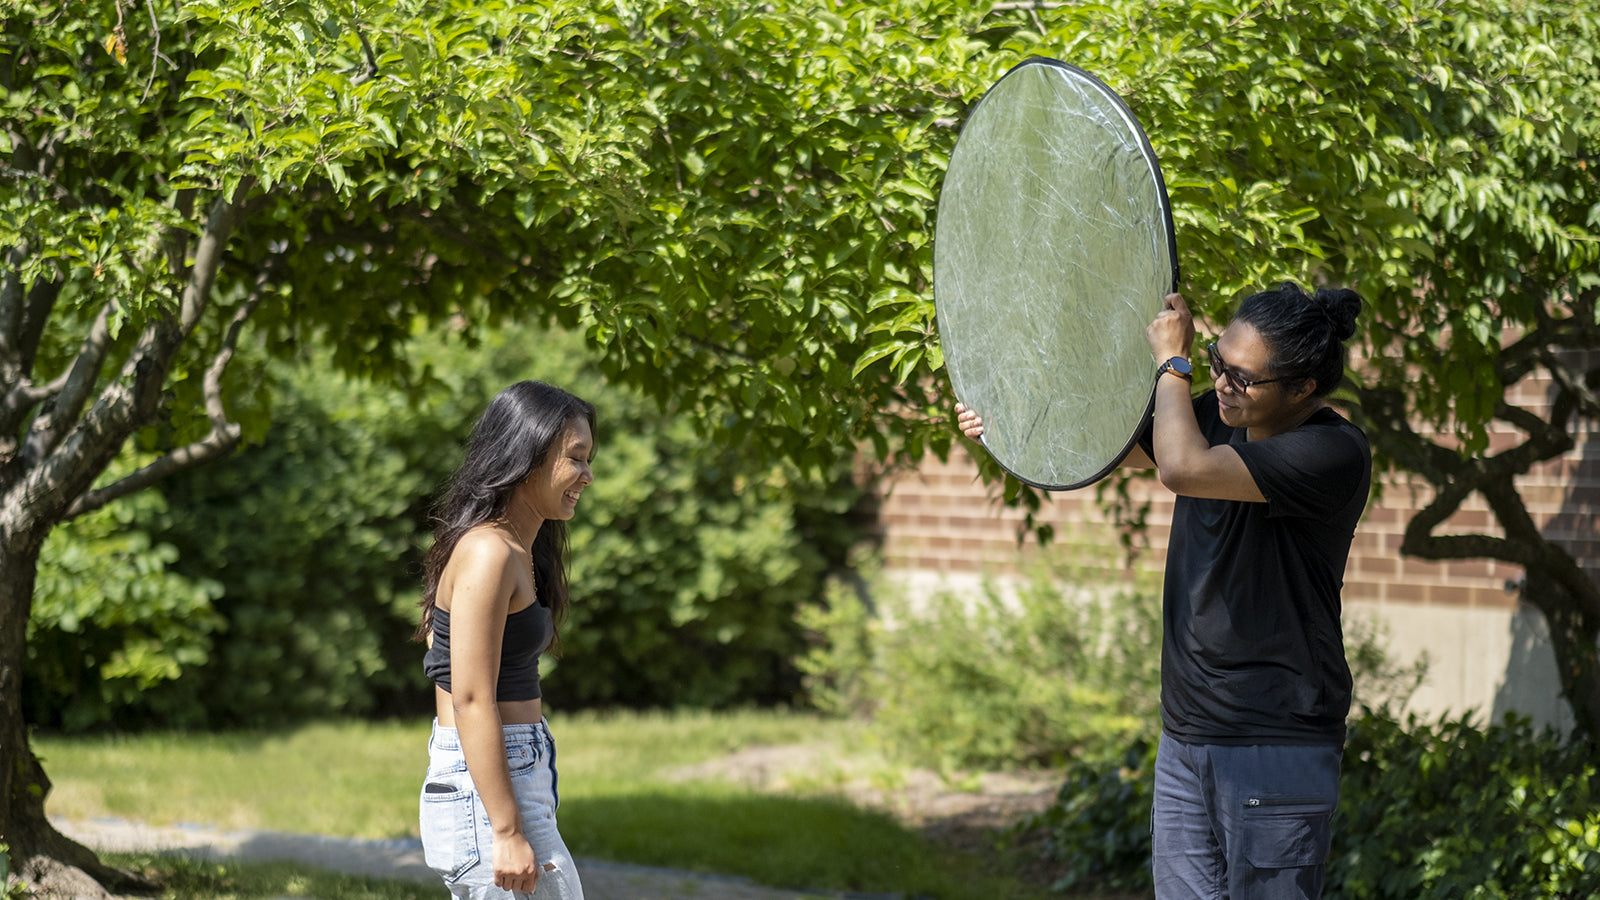
- White: subtle, neutral fill that works best close to the subject.
- Silver: more efficient and visible at greater distance, but can be dazzling and specular.
- Gold: adds warmth that can look artificial or complicate skin color.
- Translucent diffuser: placed between sun and subject to enlarge and soften the effective source.
- Black surface: removes stray bounce and restores shadow shape.
Walls, pavement, sand, snow, and pale clothing are natural reflectors. Notice their color: a red brick wall can cast red light, while grass can add green beneath a face.
Fill flash outdoors
A small flash can lift eye shadows, balance a backlit portrait, or add a catchlight. Start with less flash than the ambient exposure so the result still looks like outdoor light.
Shutter speed controls how much ambient light appears until you exceed the camera's normal flash synchronization limit. High-speed sync allows wider apertures or faster shutters in bright conditions, but reduces effective flash power. Move the flash closer or use a larger unit rather than expecting a tiny flash to overpower midday sun at a long distance.
Exposure strategy
Outdoor scenes change too quickly for one universal mode. Aperture Priority works well when depth of field matters and the light changes gradually. Manual exposure gives consistency when the subject remains under steady light but the background composition changes. Auto ISO can protect shutter speed for wildlife and people.
Watch important highlights in white clothing, clouds, water, and reflective skin. Use the histogram and highlight alert, because the rear display's brightness changes with ambient conditions. If the subject moves between sun and shade, reassess rather than relying on the previous exposure.
White balance and mixed color
Direct sun, open shade, clouds, foliage, and artificial fixtures can all have different color. RAW capture preserves the most flexibility, but a consistent in-camera white balance makes a sequence easier to judge.
Auto white balance is convenient for travel and changing conditions. For client work or panoramas, a fixed preset or measured value prevents frame-to-frame shifts. Photograph a gray reference in the actual subject light when accurate product or skin color matters.
Outdoor portraits
- Choose a background before placing the person.
- Look for open shade or place the sun behind and slightly to one side.
- Turn the face toward the brightest open sky.
- Check the eyes, hair edge, and background brightness.
- Add white bounce or restrained flash only if the shadows need it.
- Keep the subject comfortable and never ask anyone to stare toward harsh sun.
Landscapes and architecture
Side light often gives the strongest sense of depth. Front light can produce clean color, while backlight emphasizes haze, silhouette, or translucent foliage. Revisit a viewpoint at different times because the same hill or facade may become readable only when shadows cross it.
A circular polarizer can reduce reflection and deepen parts of a blue sky, but its effect varies across a wide-angle frame and is weak when aimed toward or away from the sun. It cannot repair clipped highlights.
Wildlife, sports, and movement
Subject behavior and shutter speed may matter more than perfect light. Position yourself so action occurs against a clean background and use the highest usable ISO needed to keep the required shutter speed. Backlight can outline fur, feathers, dust, or spray, but autofocus and exposure may become less reliable near the bright source.
Never sacrifice safety or disturb wildlife to chase a lighting angle. Learn the location rules and keep an escape route from water, traffic, cliffs, and changing tides.
Close-ups outdoors
A flower or small product can be shaded with a diffuser, jacket, or your body, then relit with a white card. Wind is often a larger problem than brightness: stabilize the subject only when ethical and permitted, raise shutter speed, and make short bursts during pauses.
Plan, then adapt
Scout the background, sun path, access, parking, tides, and closing time. Arrive early enough to see where light actually enters the scene. Bring a small fallback kit: lens hood, white reflector, diffuser, compact flash, rain cover, cleaning cloth, and a data-backed weather forecast.
A forecast is not a contract. Clouds can create a better photograph than the clear sunset you expected. Build a shot list for hard sun, soft cloud, rain, and twilight so the session has more than one route to success.
Common mistakes
- Waiting only for golden hour. Shade, cloud, twilight, and graphic midday light all have useful qualities.
- Ignoring bounce color. Grass and painted walls can contaminate skin tone.
- Using a reflector from too far away. Bring it close and watch the eyes rather than merely pointing it at the subject.
- Underexposing every backlit subject. Decide whether you want detail, rim light, or silhouette.
- Trusting the LCD outdoors. Use exposure data and highlight warnings.
- Forgetting that light moves. Recheck direction and exposure throughout the session.
The goal is not to force every condition into the same soft look. Read the light you have, choose a subject and composition that benefit from it, and make only the changes the photograph needs.
Frequently Asked Questions
-
There is no single best light. Golden hour is warm and directional, overcast and open shade are soft, blue hour balances ambient and artificial light, and hard sun suits graphic shadows and saturated color.
-
Use open shade, turn the face toward the open sky, choose a background at a similar brightness, and add a nearby white reflector or gentle fill flash if needed.
-
No. Natural light is often sufficient. Flash becomes helpful when you need a catchlight, want to lift deep shadows, or must balance a backlit subject with a brighter background.
-
Aperture Priority is convenient for changing light, Manual provides consistency under stable light, and Manual with Auto ISO can protect shutter speed for movement. Monitor highlights in every mode.
-
Use a sun-position or weather app as a starting point, then account for latitude, season, clouds, buildings, mountains, and the real horizon at the location. Arrive early.