Directional Lighting in Photography: A Practical Guide
Learn how front, side, back, top, and below lighting change texture, shape, contrast, and mood—and how to choose a direction on location or in a studio.
Direction, quality, and intensity are different
Direction describes where light comes from. Quality describes the shadow transition—hard or soft. Intensity describes how much light reaches the subject. Color describes its spectrum or apparent warmth.
A large softbox at camera left and a bare flash at camera left share a direction but produce very different shadow edges. Keeping these properties separate makes lighting easier to diagnose.
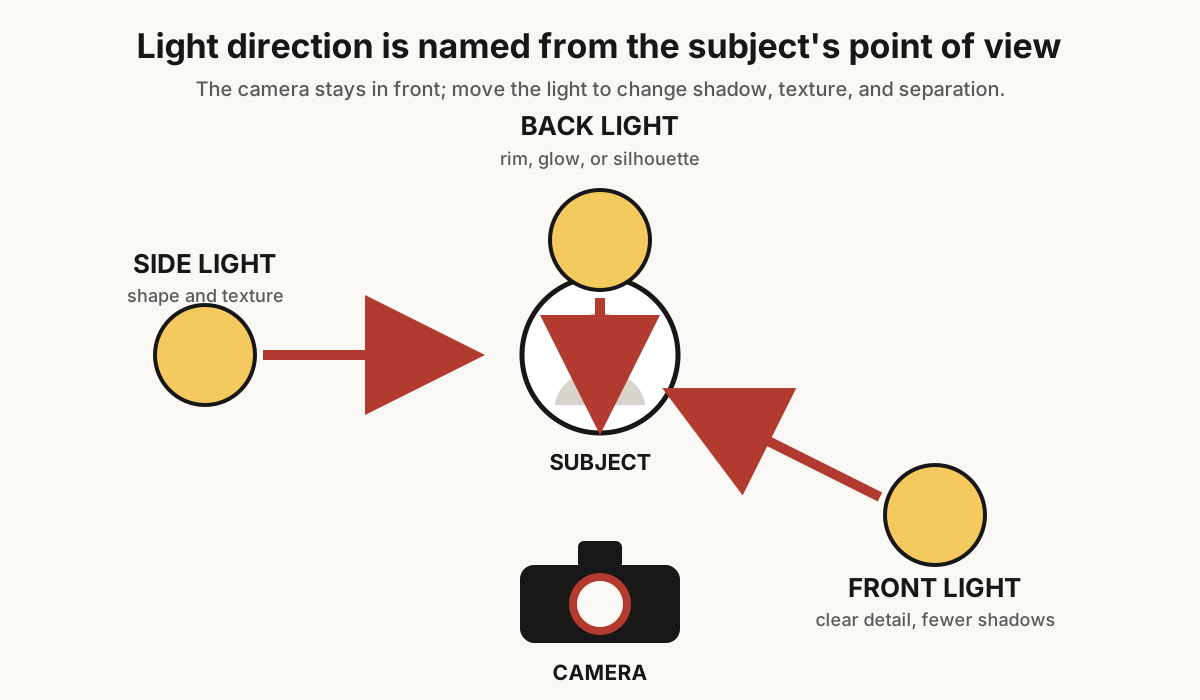
Front lighting
Front light comes from near the camera axis and strikes the side of the subject facing the lens. It reduces visible shadows, records color clearly, and can make skin or flat artwork easy to read.
The same evenness can suppress texture and depth. A small direct flash may also create glare on skin, glass, and glossy products, plus a dark shadow directly behind the subject.
Use front light for: documentation, groups that need consistent exposure, colorful scenes, and fill in strong ambient light. Improve it by enlarging the source, moving it slightly off-axis, or raising it enough to place natural-looking shadows below facial features.
Forty-five-degree light
Place the light roughly 45 degrees to one side of the camera and somewhat above the subject. This is a flexible starting point because it lights both eyes while creating enough shadow to describe the nose, cheek, and jaw.
The angle is not a rule. Rotate the subject, raise the source, and watch the shadow rather than measuring degrees. For products, the same position can show form without splitting the object into equal bright and dark halves.
Side lighting
With the source near 90 degrees to the camera, one side faces the light and the other falls into shade. Side light makes small changes in surface angle visible, so it is excellent for weathered faces, fabric, food, architecture, sand, bark, and relief.
It can also exaggerate uneven texture and produce excessive contrast. Move the source slightly forward, bring a reflector toward the shadow side, or use a larger source if important detail disappears.
Backlighting
Backlight comes from behind the subject toward the camera. It can create a rim around hair, leaves, glass, smoke, and translucent material. When the background is bright and the subject receives little front illumination, the result becomes a silhouette.
Backlight demands deliberate exposure. Metering the whole frame may make the subject too dark; metering the subject can overexpose the background. Decide which area matters, check the histogram and highlight warning, then add reflected or artificial fill if both need detail.
Keep the lens clean and shade its front element to control flare. Flare can be expressive, but accidental veiling lowers contrast and can shift color.
Top lighting
Overhead light casts shadows under brows, noses, chins, hats, and product edges. Midday sun and ceiling fixtures often create this pattern. It can feel dramatic or severe and is useful when you want graphic shapes on horizontal surfaces.
For a face, bring the light forward so catchlights remain visible, or use a low reflector to open the eyes. Turning off ceiling lights and using a side window often produces a more coherent direction indoors.
Lighting from below
Light from below reverses familiar facial shadows, which is why it can look theatrical or unsettling. It is also natural for subjects illuminated by water, snow, a bright table, a campfire, or a screen.
Use it intentionally and with restraint. A low reflector is usually fill rather than the main source; if it becomes brighter than the key light, the face can appear oddly inverted.
How to read light direction
Before lifting the camera, look for four clues:
- Cast shadows: they extend away from the source.
- Form shadows: the gradual dark side reveals the subject's three-dimensional shape.
- Specular highlights: bright reflections show the source's position and apparent size.
- Catchlights: reflections in eyes reveal direction, height, and sometimes the source shape.
Hold a hand in the subject position and rotate it. The highlight and shadow move immediately, making your hand a useful location scout.
Change direction without moving the light
The sun and a large window may be fixed, but the geometry is not. Walk around the subject, turn the subject toward or away from the source, or move to another side of a building. A front-lit scene becomes side-lit when you move 90 degrees around it and backlit when you face the source.
For landscapes, wait as the sun moves across the terrain. Low side light can reveal ridges that appear flat at noon.
One main direction, then fill
The brightest influential source is the key light. A reflector or second source can raise the shadow level while preserving the key's direction.
Think in ratios rather than simply adding more light. Very weak fill keeps a moody shadow. Strong fill makes the result flatter. If the fill becomes brighter than the intended key, the apparent direction changes.
- White reflector: gentle, neutral fill at close range.
- Silver reflector: stronger and more directional, with a risk of glare.
- Black flag: subtracts ambient bounce to deepen a shadow.
- Diffuser: softens the light that passes through it but does not automatically fill the opposite side.
Direction for portraits
Start with the face turned slightly toward a window or soft source. Watch whether the nose shadow connects to the cheek, whether both eyes receive light, and whether glasses reflect the source.
Move the camera and face by inches. A small turn can clean up glasses, restore a catchlight, or shift from broad lighting—illuminating the cheek nearest the camera—to short lighting, where the far cheek is brighter. Short lighting often emphasizes facial shape.
Direction for products and food
Front light explains labels but can reflect the camera in glossy packaging. Side or back-side light reveals edges, steam, texture, and translucency. Move the light while watching the live-view reflection, then use white or black cards to sculpt bright and dark lines.
For reflective objects, you often photograph the reflection of the source, not the source's direct beam. A large diffusion panel creates a clean gradient that a small bare lamp cannot.
Direction in landscapes and streets
Front light can produce clear color and an accessible postcard look. Side light separates repeating forms and makes long shadows part of the composition. Backlight simplifies crowds, catches atmospheric haze, and outlines rain or foliage.
Expose for important highlights and wait for gestures to enter readable patches of light. A bright subject against a dark shadow often has more impact than trying to lift every area evenly.
Metering and exposure
Directional scenes frequently exceed the camera's dynamic range. Use the histogram and highlight warnings, not only the rear-screen preview. In RAW capture, protect irreplaceable highlights, then decide how much shadow can be lifted without losing the intended mood.
Spot or highlight-weighted metering can help, but exposure compensation remains an artistic decision. A backlit portrait does not have one universally correct brightness.
A ten-minute practice exercise
- Place a textured object one meter from a plain background.
- Use one lamp and keep the camera fixed.
- Make frames with the lamp at front, 45 degrees, side, back-side, and back positions.
- Keep exposure on the object consistent.
- Compare edge separation, texture, shadow shape, and background tone.
- Add a white card to the shadow side and repeat one setup.
This isolates direction more clearly than buying another modifier.
Common mistakes
- Calling hard light directional and soft light non-directional. Any source has a direction; softness is separate.
- Adding fill until all modeling disappears. Preserve enough shadow to communicate form.
- Ignoring the background. Its brightness changes how the subject's light feels.
- Moving lights before reading shadows. Diagnose first, then make one change at a time.
- Accepting accidental mixed directions. Ceiling light, window light, and flash can create competing shadows.
Direction is one of the most powerful lighting controls because it costs nothing. Move yourself, the subject, or the source until the shadows support the photograph.
Frequently Asked Questions
-
It is light arriving predominantly from a recognizable position relative to the subject, creating highlights and shadows that describe form, texture, depth, and mood.
-
Yes when you want shape and texture. If the contrast is too strong, rotate the face toward the source, enlarge the source, or add controlled fill on the shadow side.
-
Front light illuminates the camera-facing surface and minimizes visible shadows. Backlight comes toward the camera from behind the subject, producing rim light, translucency, flare, or silhouette.
-
Yes. Softness describes the width of the shadow transition; direction describes where the light comes from. A large window can be both soft and strongly directional.
-
You cannot move the sun, but you can move around the subject, turn the subject, choose another side of a building, or wait for the sun's position to change.