How to Use the Rule of Thirds in Photography
Use a simple 3×3 grid to place subjects, horizons, faces, and movement with more intention—and learn when centered framing is the stronger choice.
What the rule actually suggests
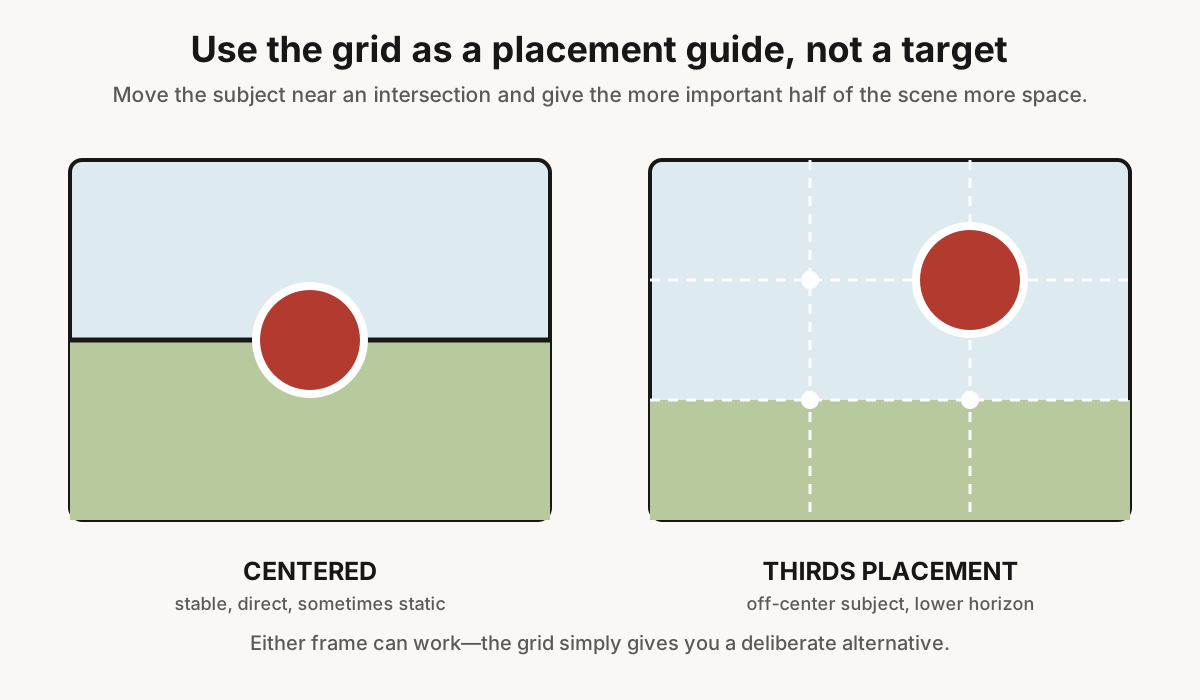
Imagine a tic-tac-toe grid over the frame. The four intersections are possible locations for a main focal point, while the lines can organize horizons, walls, faces, or other strong divisions.
You do not need to place the entire subject on a point. For a portrait, an eye may be the focal point. For a bird, it may be the head. For a landscape, the sun or a tree may sit near an intersection while the horizon follows a horizontal line.
Why off-center placement can work
A centered subject creates immediate stability. Moving it away from the center introduces unequal visual areas. That asymmetry can make the eye travel between the subject and its environment, allow a gesture to continue, or give secondary information room to breathe.
The grid is helpful because it provides a repeatable alternative to placing everything in the middle by habit. It does not explain every successful off-center composition, and an intersection has no magical power.
Choose the focal point first
Before moving the camera, ask what the photograph is about. A busy scene may contain a person, sign, bright window, and dramatic cloud. If all receive equal emphasis, the thirds grid will not rescue the composition.
- Name the main subject.
- Identify its most important detail.
- Decide what supporting element or negative space needs to remain.
- Place the focal detail near a useful intersection.
- Scan the whole frame for new distractions.
Place the horizon with a reason
A lower-third horizon gives more space to sky; an upper-third horizon emphasizes land or foreground. Choose based on content, not a routine.
- Use a lower horizon for dramatic clouds, weather, stars, or tall architecture.
- Use a higher horizon for patterns, roads, reflections, or strong foreground texture.
- Use a centered horizon when a reflection, symmetry, or deliberate calm depends on equal halves.
Keep the horizon level unless the tilt is visibly intentional. Grid lines help with both placement and leveling, but correct perspective may require camera alignment or later correction.
People and portraits
For a close portrait, place the nearer or more expressive eye near an upper intersection. The face can occupy far more than one third of the frame; the eye placement is what anchors the composition.
For an environmental portrait, place the person on a vertical third and use the other two thirds to explain the location. Make sure the environment contributes information instead of becoming unused clutter.
If the subject looks across the frame, leaving space in that direction usually feels open and natural. Cropping tightly against the gaze can create tension, which may be exactly what you want.
Movement and lead room
Place a runner, car, animal, or boat so there is room in front of its movement. The open area implies a destination and lets the viewer anticipate what happens next.
This is not mandatory. Placing a moving subject near the edge it is approaching can increase urgency or suggest it is leaving. The important point is to recognize the effect rather than apply space automatically.
Landscapes
A common landscape structure uses one strong foreground subject near a lower intersection, a path or shoreline leading through the frame, and a horizon near the upper third. That can work, but avoid building the same template at every location.
Try four variations: subject at each intersection, then a centered version. Compare how the balance changes. Moving only the camera position can also change overlaps and perspective, which often matters more than sliding the crop sideways.
Street and documentary photography
Anticipate where action will occur. Choose a background with a clean patch or strong geometry, compose it using the grid, and wait for the person or gesture to enter the intended area.
For unpredictable moments, prioritize timing and focus. A slightly imperfect placement with a meaningful expression is usually stronger than an empty perfect grid. Crop modestly later if it improves clarity without falsifying the event.
Wildlife and sports
Place the eye or head near an intersection and leave room for gaze or motion. With erratic subjects, use an autofocus area that can track away from the center, or frame slightly wider and refine later.
Do not let composition cause clipped wings, feet, equipment, or a ball at the edge. Fast action often needs extra safety space.
Still life, food, and products
Put the hero object or its most recognizable feature near an intersection, then use props along lines to balance the remaining space. Product labels and edges must remain readable; off-center placement is not useful if it hides the information the image must deliver.
A top-down arrangement can use several intersections, but avoid placing four equally strong objects on all four points. Create hierarchy with size, brightness, focus, color, or spacing.
Using the camera grid
Most cameras and phones offer grid lines in display or viewfinder settings. They are guides only and do not appear in the final file. Some cameras offer several grids, so choose the 3×3 option rather than confusing it with a denser alignment grid.
Keep the grid on until you notice placement instinctively. Then turn it off occasionally so it does not become a cage.
Focus, then recompose?
Single-point autofocus can focus on a subject, lock, and recompose. With shallow depth of field, rotating the camera after focus can shift the focus plane enough to soften an eye. A movable focus point, face/eye detection, or tracking is often more reliable.
Composition should not compromise critical focus. Use the focusing method appropriate to the subject and aperture.
Apply thirds during cropping
Editing software commonly includes a thirds overlay in the crop tool. Use it to refine an existing composition, straighten the horizon, or choose an aspect ratio for publication.
Watch resolution and edge relationships. Cropping a subject onto an intersection while cutting a hand, sign, or reflection awkwardly is not an improvement. Save a new version rather than overwriting the original.
When centered composition is stronger
- Symmetry: architecture, corridors, and reflections often need a precise central axis.
- Radial subjects: flowers, wheels, and spirals naturally organize around a center.
- Direct portraits: centered eye contact can feel confrontational, intimate, or formal.
- Minimal scenes: a lone subject in balanced negative space may gain power from stillness.
- Patterns: central alignment can reinforce repetition or expose one deliberate break.
- Fast action: central framing may make tracking more dependable and emphasize impact.
Common mistakes
- Forcing every subject onto a dot. The grid suggests options, not compulsory coordinates.
- Ignoring visual weight. A bright secondary object can overpower a correctly placed subject.
- Choosing a horizon third automatically. Decide whether sky or ground carries the story.
- Leaving empty space with no purpose. Negative space should affect mood, direction, or scale.
- Recomposing out of focus. Use an off-center focus point or tracking when depth of field is thin.
- Never making a centered version. Comparison teaches more than obedience.
A practical exercise
- Choose a stationary subject against a simple background.
- Make one centered frame.
- Place the focal detail at each of the four intersections.
- Make one version with generous gaze or lead room.
- Make one deliberately tight or tense version.
- Review them without the grid and note which supports the subject best.
The rule of thirds is most useful when it creates choices. Once you can see those choices, use the composition that best expresses the scene—even when it breaks the grid.
Frequently Asked Questions
-
It is a composition guideline that divides the frame into a 3×3 grid and suggests placing important details near the four intersections or strong boundaries along the grid lines.
-
No. Placement near a line or intersection is enough to explore the effect. Focus, timing, background, and visual balance matter more than exact coordinates.
-
Use the lower line when the sky deserves emphasis and the upper line when the foreground matters more. Center it when reflection or symmetry benefits from equal halves.
-
No. An eye near an upper intersection often works, but centered portraits can feel direct, formal, intimate, or powerful.
-
Yes. Most crop tools offer a thirds overlay. Refine placement while watching resolution, aspect ratio, subject edges, and any context lost from the frame.